
Beginning of the month Apple announced
SwiftUI
at the
WWDC 2019.
A single “cross platform”, “declarative” framework used to build
tvOS, macOS, watchOS and iOS
UIs.
SwiftWebUI
is bringing that to the Web ✔️
Disclaimer: This is a toy project!
Do not use for production.
Use it to learn more about SwiftUI and its inner workings.
SwiftWebUI
So what exactly is
SwiftWebUI?
It allows you to write SwiftUI
Views
which display in a web browser:
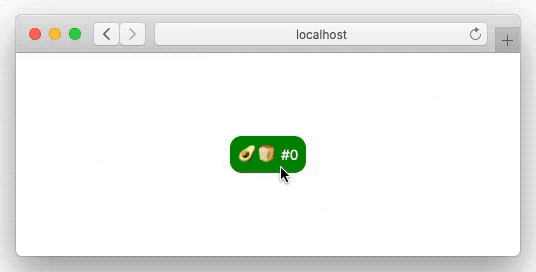
import SwiftWebUI

struct MainPage: View {
  @State var counter = 0

  func countUp() { counter += 1 }

  var body: some View {
    VStack {
      Text("🥑🍞 #(counter)")
        .padding(.all)
        .background(.green, cornerRadius: 12)
        .foregroundColor(.white)
        .tapAction(self.countUp)
    }
  }
}
Results in:
Unlike some other efforts this doesn’t just render SwiftUI Views
as HTML.
It also sets up a connection between the browser and the code hosted
in the Swift server, allowing for interaction –
buttons, pickers, steppers, lists, navigation, you get it all!
In other words:
SwiftWebUI
is an implementation of (many but not all parts of) the SwiftUI API for the browser.
To repeat the
Disclaimer: This is a toy project!
Do not use for production.
Use it to learn more about SwiftUI and its inner workings.
Learn once, use anywhere
The stated goal of SwiftUI is not
“Write once, run anywhere”
but
“Learn once, use anywhere”.
Don’t expect to be able to take a beautiful SwiftUI application for iOS,
drop the code into a SwiftWebUI project and get it to render exactly the same in
the browser.
That is not the point.
The point is to be able to reuse the
knoff-hoff
and share it between different platforms.
In this case, the Web ✔️
But lets get down to the nitty gritty and write a simple SwiftWebUI application.
In the spirit of
“Learn once, use anywhere”
watch those two WWDC sessions first:
Introducing SwiftUI
and
SwiftUI Essentials.
We don’t go that deep in this blog entry,
but this one is recommended too (and the concepts are mostly supported in SwiftWebUI):
Data Flow Through SwiftUI.
Requirements
As of today SwiftWebUI requires a
macOS Catalina
installation to run (“Swift ABI” 🤦♀️).
Fortunately it is really easy to
install Catalina on a separate APFS volume.
And an installation of
Xcode 11
is required to get the new Swift 5.1 features SwiftUI makes heavy use of.
Got that? Very well!
Linux? The project is indeed prepared to run on Linux,
but that hasn’t been finished yet.
The only real thing missing is a simple implementation
of the
Combine
PassthroughSubject
and a little infrastructure surrounding that.
Prepared: NoCombine.
PRs are welcome!
Mojave? There is a chance to get this to run on Mojave w/ Xcode 11.
You’d need to create an iOS 13 simulator project and run the
whole thing within that.
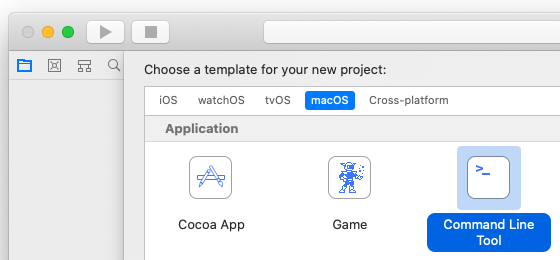
Getting Started with a First App
Creating a SwiftWebUI Project
Fire up Xcode 11, select “File > New > Project…” or just press Cmd-Shift-N:

Select the “macOS / Command Line Tool” project template:
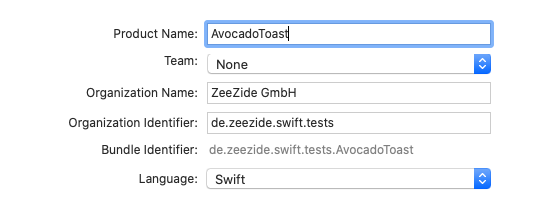
Give it some nice name, let’s go with “AvocadoToast”:
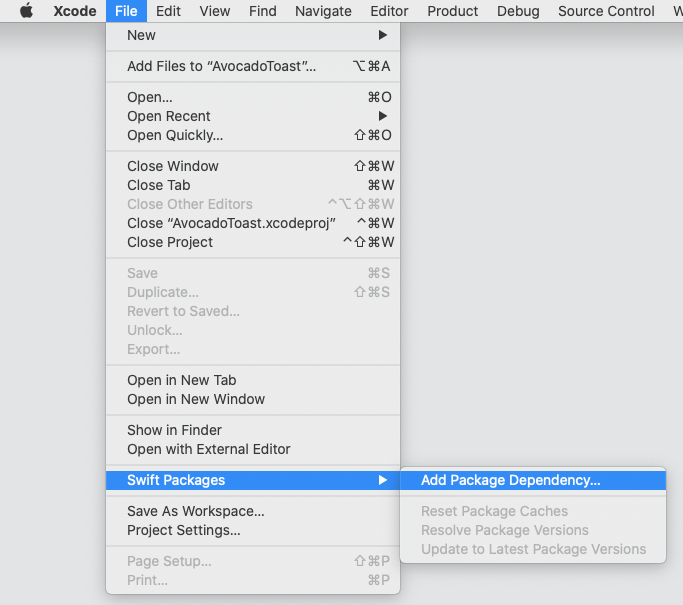
Then we add
SwiftWebUI
as a Swift Package Manager dependency.
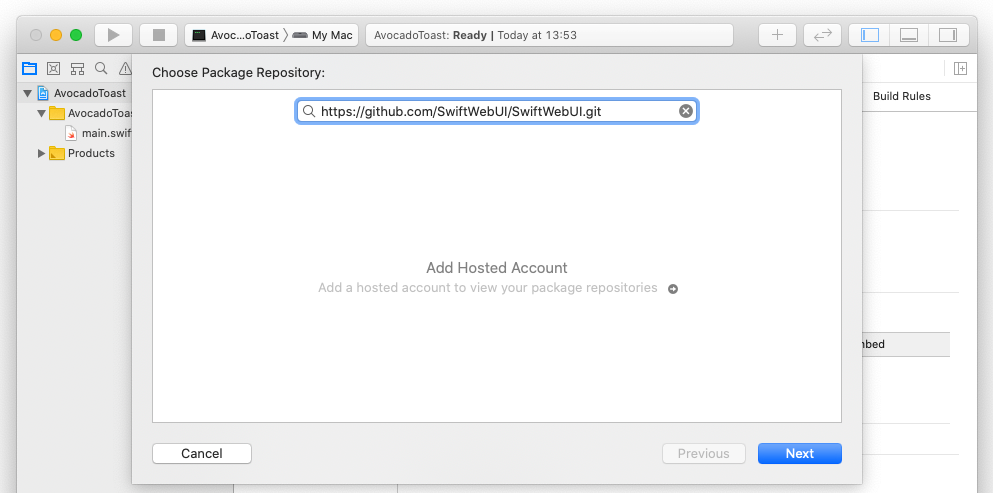
The option is hidden in the “File / Swift Packages” menu group:
Enter https://github.com/SwiftWebUI/SwiftWebUI.git as the package URL:
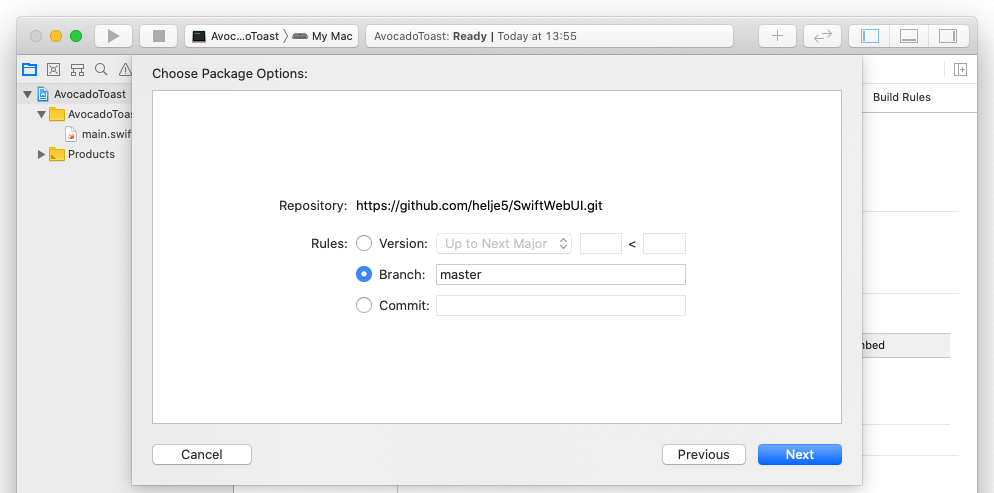
Use “Branch” master option to always get the latest and greatest
(you can also use a revision or the develop branch):
Finally add the SwiftWebUI library to your tool target:
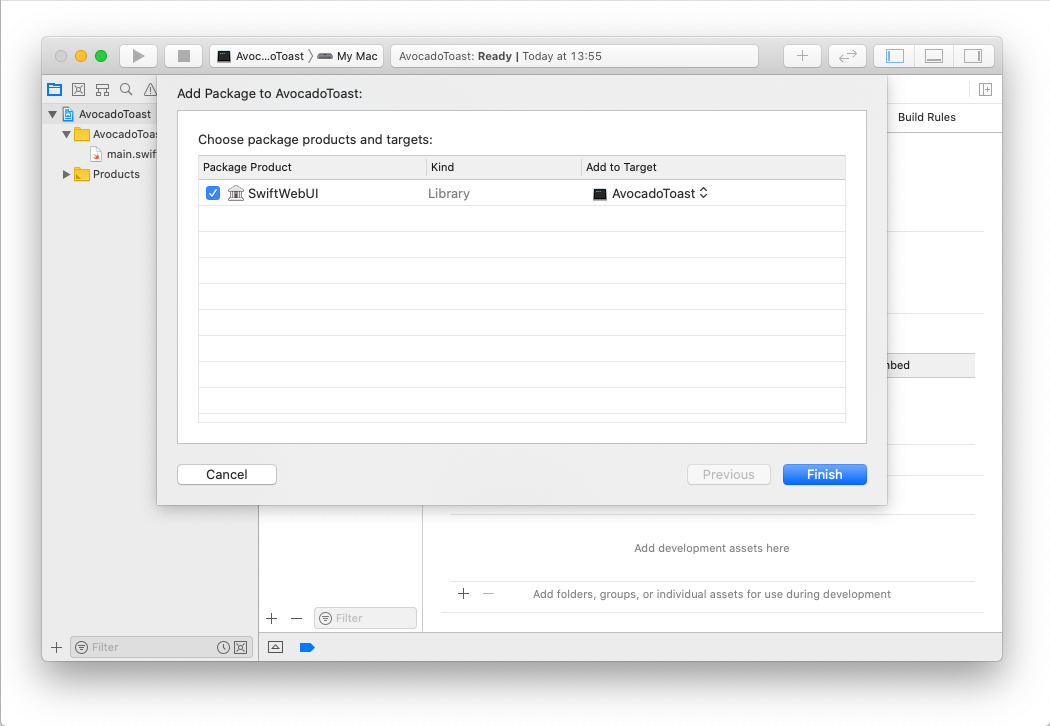
That’s it. You now have a tool project which can import SwiftWebUI.
(Xcode might take a moment to fetch and build the dependencies.)
SwiftWebUI Hello World
Let’s get started w/ SwiftWebUI.
Open the main.swift file and replace it’s content
with:
import SwiftWebUI

SwiftWebUI.serve(Text("Holy Cow!"))
Compile and run the app in Xcode, open Safari and hit
http://localhost:1337/:

What is going on here:
First the SwiftWebUI module is imported (don’t accidentially import the macOS SwiftUI 😀)
Then we call SwiftWebUI.serve which either takes a a closure
returning a View, or just a straight View – as shown here: a
Text
View (aka a “UILabel” which can show plain or formatted text).
Behind the scenes
Internally the
serve
function creates a very simple
SwiftNIO
HTTP server listening on port 1337.
When the browser hits that server, it creates a
session
and passes our (Text) View to that session.
Finally, from the View, SwiftWebUI creates a
“Shadow DOM” on the server,
renders that as HTML and sends the result to the server.
That “Shadow DOM” (and a state object kept alongside) is
stored in the session.
This is a difference between a SwiftWebUI application and
a watchOS or iOS SwiftUI app.
A single SwiftWebUI application serves a bunch of users
instead of just one.
Adding some Interaction
As a first step, lets organize the code a little better.
Create a new Swift file in the project and call that
MainPage.swift.
And add a simple SwiftUI View definition to it:
import SwiftWebUI

struct MainPage: View {

  var body: some View {
    Text("Holy Cow!")
  }
}
Adjust the main.swift to serve our custom View:
SwiftWebUI.serve(MainPage())
We can now leave the main.swift alone and do all our work
in our custom
View.
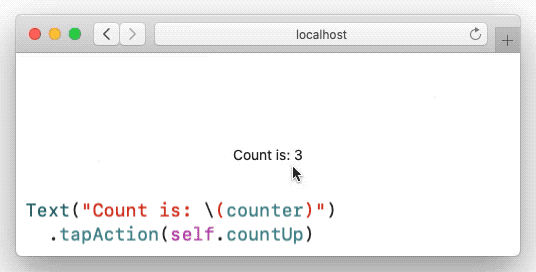
Let’s add some interaction to it:
struct MainPage: View {
  @State var counter = 3

  func countUp() { counter += 1 }

  var body: some View {
    Text("Count is: (counter)")
      .tapAction(self.countUp)
  }
}
Our
View
got a persistent
State
variable named counter
(not sure what this is? Have another look at
Introducing SwiftUI).
And a small function to bump the counter.
We then use the SwiftUI
tapAction
modifier to attach an event handler to our Text.
Finally, we show the current value within the label:
Behind the scenes
How does that work? When the browser hit our endpoint,
SwiftWebUI created the session and our “Shadow DOM”
within that.
It then sent the HTML describing our View to the browser.
The tapAction works by adding an onclick handler to
the HTML.
SwiftWebUI also ships (tiny amounts, no big framework!)
of JavaScript to the browser which handles the click
and forwards that to our Swift server.
Then the usual SwiftUI magic kicks in.
SwiftWebUI correlates the click event with the event
handler in our “Shadow DOM” and invokes the countUp
function.
By modifying the counter
State
variable the function invalidates the rendering of our View.
SwiftWebUI kicks in, and diffes the changes in the
“Shadow DOM”.
Those changes are then sent back to the browser.
The “changes” are sent as a JSON array which our small
JavaScript in the page can process.
If a whole subtree changed (e.g. if a user navigated to
a whole new View), a change can be a larger HTML snippet
which is applied toinnerHTMLorouterHTML.
But usually the changes are small things likeadd class,
set HTML attributeand the likes (i.e. browser DOM
modifications).
🥑🍞 Avocado Toast
Excellent, the basics work. Let’s bring in more interactivity.
The following is based on the “Avocado Toast App” used
to demo SwiftUI in the
SwiftUI Essentials
talk. Didn’t watch it yet? Maybe you should, it is about delicious toasts.
The HTML/CSS styling isn’t quite perfect nor beautiful yet.
As you can imagine we are not web designers and could use some
help here. PRs are welcome!
Want to skip the details, watch a GIF of the app and
download it on GitHub: 🥑🍞.
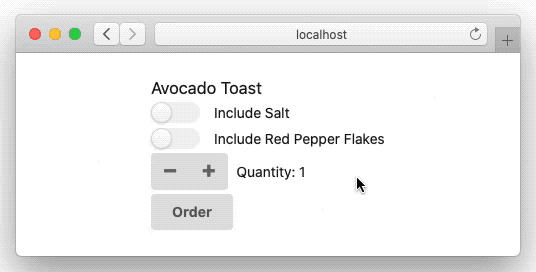
The 🥑🍞 Order Form
The talk starts off with this (~6:00), which we can add to a new OrderForm.swift
file:
struct Order {
  var includeSalt            = false
  var includeRedPepperFlakes = false
  var quantity               = 0
}
struct OrderForm: View {
  @State private var order = Order()

  func submitOrder() {}

  var body: some View {
    VStack {
      Text("Avocado Toast").font(.title)

      Toggle(isOn: $order.includeSalt) {
        Text("Include Salt")
      }
      Toggle(isOn: $order.includeRedPepperFlakes) {
        Text("Include Red Pepper Flakes")
      }
      Stepper(value: $order.quantity, in: 1...10) {
        Text("Quantity: (order.quantity)")
      }

      Button(action: submitOrder) {
        Text("Order")
      }
    }
  }
}
For testing direct SwiftWebUI.serve() in main.swift to the new
OrderForm View.
This is what it looks like in the browser:
SemanticUI is used for styling some things
in SwiftWebUI. It is not strictly required for the operation,
it just accomplishes somewhat decent looking widgets.
Note: Only the CSS/fonts are used, not the JavaScript components.
Intermission: Some SwiftUI Layout
Around 16:00 in
SwiftUI Essentials
they are getting to SwiftUI layout and View modifier ordering:
var body: some View {
  HStack {
    Text("🥑🍞")
      .background(.green, cornerRadius: 12)
      .padding(.all)

    Text(" => ")

    Text("🥑🍞")
      .padding(.all)
      .background(.green, cornerRadius: 12)
  }
}
Results in this, notice how the ordering of the modifiers is relevant:
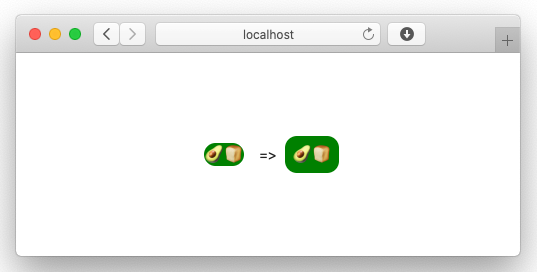
SwiftWebUI tries to replicate common SwiftUI layouts, but doesn’t
fully succeed yet. After all it has to deal with the layout system
the browser provides.
Help wanted, flexbox experts welcome!
The 🥑🍞 Order History
Back to the app, the talk (~19:50) introduces the
List
View for showing an Avocado toast order history.
This is how it looks on the Web:

The List view walks over the array of completed orders
and creates a child View for each one (OrderCell),
passing in the current item in the list.
This is the code we are using:
struct OrderHistory: View {
  let previousOrders : [ CompletedOrder ]

  var body: some View {
    List(previousOrders) { order in
      OrderCell(order: order)
    }
  }
}

struct OrderCell: View {
  let order : CompletedOrder

  var body: some View {
    HStack {
      VStack(alignment: .leading) {
        Text(order.summary)
        Text(order.purchaseDate)
          .font(.subheadline)
          .foregroundColor(.secondary)
      }
      Spacer()
      if order.includeSalt {
        SaltIcon()
      }
      else {}
      if order.includeRedPepperFlakes {
        RedPepperFlakesIcon()
      }
      else {}
    }
  }
}

struct SaltIcon: View {
  let body = Text("🧂")
}
struct RedPepperFlakesIcon: View {
  let body = Text("🌶")
}

// Model

struct CompletedOrder: Identifiable {
  var id           : Int
  var summary      : String
  var purchaseDate : String
  var includeSalt            = false
  var includeRedPepperFlakes = false
}
The SwiftWebUI List View is really inefficient, it always
renders the whole set of children. No cell reuse, no nothing 😎
There are various ways to deal with that in a web app,
e.g. by using paging or more client side logic.
So you don’t have to type down the sample data from the talk,
we did that for you:
let previousOrders : [ CompletedOrder ] = [
  .init(id:  1, summary: "Rye with Almond Butter",  purchaseDate: "2019-05-30"),
  .init(id:  2, summary: "Multi-Grain with Hummus", purchaseDate: "2019-06-02",
        includeRedPepperFlakes: true),
  .init(id:  3, summary: "Sourdough with Chutney",  purchaseDate: "2019-06-08",
        includeSalt: true, includeRedPepperFlakes: true),
  .init(id:  4, summary: "Rye with Peanut Butter",  purchaseDate: "2019-06-09"),
  .init(id:  5, summary: "Wheat with Tapenade",     purchaseDate: "2019-06-12"),
  .init(id:  6, summary: "Sourdough with Vegemite", purchaseDate: "2019-06-14",
        includeSalt: true),
  .init(id:  7, summary: "Wheat with Féroce",       purchaseDate: "2019-06-31"),
  .init(id:  8, summary: "Rhy with Honey",          purchaseDate: "2019-07-03"),
  .init(id:  9, summary: "Multigrain Toast",        purchaseDate: "2019-07-04",
        includeSalt: true),
  .init(id: 10, summary: "Sourdough with Chutney",  purchaseDate: "2019-07-06")
]
The 🥑🍞 Spread Picker
The Picker control and how to use it w/ enum’s is demonstrated ~43:00.
First the enums for the various toast options:
enum AvocadoStyle {
  case sliced, mashed
}

enum BreadType: CaseIterable, Hashable, Identifiable {
  case wheat, white, rhy

  var name: String { return "(self)".capitalized }
}

enum Spread: CaseIterable, Hashable, Identifiable {
  case none, almondButter, peanutButter, honey
  case almou, tapenade, hummus, mayonnaise
  case kyopolou, adjvar, pindjur
  case vegemite, chutney, cannedCheese, feroce
  case kartoffelkase, tartarSauce

  var name: String {
    return "(self)".map { $0.isUppercase ? " ($0)" : "($0)" }
           .joined().capitalized
  }
}
We can add those to our Order struct:
struct Order {
  var includeSalt            = false
  var includeRedPepperFlakes = false
  var quantity               = 0
  var avocadoStyle           = AvocadoStyle.sliced
  var spread                 = Spread.none
  var breadType              = BreadType.wheat
}
And then display them using the different Picker types.
It is pretty neat how you can just loop over the enum
values:
Form {
  Section(header: Text("Avocado Toast").font(.title)) {
    Picker(selection: $order.breadType, label: Text("Bread")) {
      ForEach(BreadType.allCases) { breadType in
        Text(breadType.name).tag(breadType)
      }
    }
    .pickerStyle(.radioGroup)

    Picker(selection: $order.avocadoStyle, label: Text("Avocado")) {
      Text("Sliced").tag(AvocadoStyle.sliced)
      Text("Mashed").tag(AvocadoStyle.mashed)
    }
    .pickerStyle(.radioGroup)

    Picker(selection: $order.spread, label: Text("Spread")) {
      ForEach(Spread.allCases) { spread in
        Text(spread.name).tag(spread) // there is no .name?!
      }
    }
  }
}
The result:
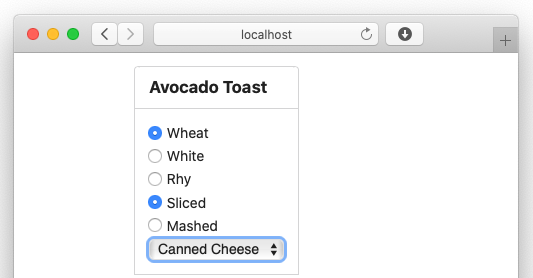
Again, this needs some CSS love to make it look better …
The 🥑🍞 “Finished” App
No we diverge a little from the original, and do not really finish it either.
It doesn’t look that great yet, but it is a demo after all 😎
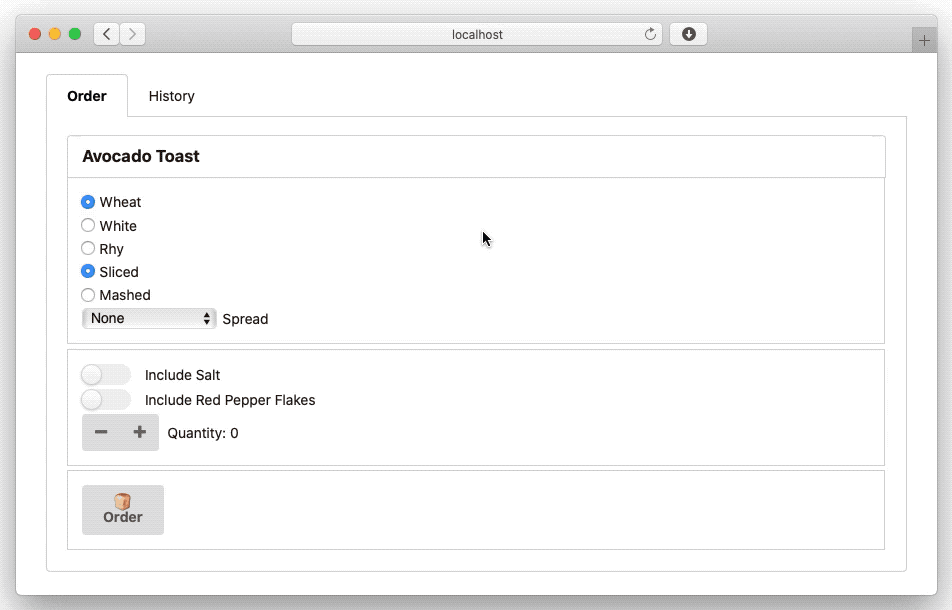
The finished app is available on GitHub:
AvocadoToast.
HTML and SemanticUI
The
UIViewRepresentable
peer in SwiftWebUI is emitting raw HTML.
Two variants are provided, the HTML outputs a String as-is,
or by HTML escaping the contents:
struct MyHTMLView: View {
var body: some View {
VStack {
HTML("")
HTML("42 > 1337", escape: true)
}
}
}
Using this primitive you can essentially build any HTML you want.
A little higher level and even used internally is
HTMLContainer.
For example this is the implementation of our Stepper control:
var body: some View {
  HStack {
    HTMLContainer(classes: [ "ui", "icon", "buttons", "small" ]) {
      Button(self.decrement) {
        HTMLContainer("i", classes: [ "minus", "icon" ], body: {EmptyView()})
      }
      Button(self.increment) {
        HTMLContainer("i", classes: [ "plus", "icon" ], body: {EmptyView()})
      }
    }
    label
  }
}
The HTMLContainer is “reactive”, i.e. it will emit regular DOM
changes if classes, styles or attributes change (instead of
re-rendering the whole thing)
SemanticUI
SwiftWebUI also comes w/ a few
SemanticUI
controls pre-setup:
VStack {
  SUILabel(Image(systemName: "mail")) { Text("42") }
  HStack {
    SUILabel(Image(...)) { Text("Joe") } ...
  }
  HStack {
    SUILabel(Image(...)) { Text("Joe") } ...
  }
  HStack {
    SUILabel(Image(...), Color("blue"),
             detail: Text("Friend"))
    {
      Text("Veronika")
    } ...
  }
}
… renders such:

Note that SwiftWebUI also supports some SFSymbols image names (via
Image(systemName:)).
Those are backed by SemanticUI’s
support for Font Awesome.
There is also SUISegment, SUIFlag andSUICard:
SUICards {
  SUICard(Image.unsplash(size: UXSize(width: 200, height: 200),
                         "Zebra", "Animal"),
          Text("Some Zebra"),
          meta: Text("Roaming the world since 1976"))
  {
    Text("A striped animal.")
  }
  SUICard(Image.unsplash(size: UXSize(width: 200, height: 200),
                         "Cow", "Animal"),
          Text("Some Cow"),
          meta: Text("Milk it"))
  {
    Text("Holy cow!.")
  }
}
… renders those:

It is very easy and a lot of fun to add such Views.
One can quickly compose pretty complex and good looking layouts
using WOComponent’s SwiftUI Views.
Image.unsplashconstructs image queries against the Unsplash API
running athttp://source.unsplash.com.
Just give it some query terms, the size you want and optional scopes.
Note: That specific Unsplash service seems to be a little slow and unreliable
sometimes.
That’s it for our demo. We hope you like it!
But to again repeat the
Disclaimer: This is a toy project!
Do not use for production.
Use it to learn more about SwiftUI and its inner workings.
We think it is a nice toy and likely a valuable tool to learn more
about the inner workings of SwiftUI.
Abitrary Technology Notes
Just a set of notes on various aspects of the technology.
Can be skipped, not that interesting 😎
Issues
There are a whole lot of issues, some are filed on GitHub:
Issues.
Feel free to file more.
Quite a few HTML layout things (e.g. ScrollView doesn’t always
scroll),
but also some open ends like Shapes (which might be easy to do
via SVG &| CSS).
Oh, and the single case If-ViewBuilder doesn’t work. No idea why:
var body: some View {
  VStack {
    if a > b {
      SomeView()
    }
    // currently need an empty else: `else {}` to make it compile.
  }
}
Halp wanted! PRs welcome!
Vs the original SwiftUI
This implementation is pretty simple and inefficient.
The real thing has to deal with a much higher rate of state
modifying events, does all the animation things at 60Hz frame rates,
etc etc.
Our’s focuses on getting the basic operations right,
e.g. how States and Bindings work, how and when Views get updated,
and so on.
Quite possible that the implementation does some things incorrectly,
Apple forgot to send us the original’s sources as part of Xcode 11.
WebSockets
We currently use AJAX to connect the browser to the server.
Using WebSockets would have multiple advantages:
- guaranteed event ordering (AJAX requests can arrive out of sync)
- non-user initiated, server side DOM updates (timers, push)
- session timeout indicator
It would make a chat client demo trivial.
Adding WebSockets is actually really easy because events are already
sent as JSON. We just need the client and server side shims.
All this is already tried out in
swift-nio-irc-webclient
and just needs to be ported over.
SPA
The current incarnation of SwiftWebUI is an SPA (single page application)
attached to a stateful backend server.
There are other ways to do this, e.g. by persisting the tree states
while the user traverses through an application via regular links.
Aka WebObjects 😉
In general it would be nice to have better control on DOM ID generation,
link generation, routing and more.
Similar to what SwiftObjects provides.
But in the end a user would have to give up a lot of the
“Learn once, use anywhere”
since SwiftUI action handlers often are built around the fact that
those capture arbitrary state.
We’ll see what Swift based server side frameworks come up with 👽
WASM
The whole thing would become more useful once we get proper Swift WASM.
Go WASM!
WebIDs
Some SwiftUI Views like ForEach require Identifiable objects, where
the id can be any Hashable.
This doesn’t play too well w/ the DOM, because we need string based IDs
to identify the nodes.
This is worked around by mapping IDs to strings in a global map. Which
is technically unbounded (a particular issue w/ class references).
Summary: For web code it is better to identify items using strings or
ints.
Form
The Form could use a lot more love:
Issue.
SemanticUI has some good form layouts, we should probably rewrite
the child trees to those. TBD.
WebObjects 6 for Swift
Took a while to make it click, but:
SwiftUI summarised for 40s+ people. pic.twitter.com/6cflN0OFon
— Helge Heß (@helje5) June 7, 2019
With
SwiftUI
Apple indeed gave us a “Swift-style”
WebObjects 6!
Next: Direct To Web and some Swift’ified EOF (aka CoreData aka ZeeQL).
Links
- SwiftWebUI on GitHub
- SwiftUI
- Introducing SwiftUI (204)
- SwiftUI Essentials (216)
- Data Flow Through SwiftUI (226)
- SwiftUI Framework API
- SwiftObjects
- SemanticUI
- SwiftNIO
Hey, we hope you liked the article and we love feedback!
Twitter, any of those:
@helje5,
@ar_institute.
Email: wrong@alwaysrightinstitute.com.
Slack: Find us on SwiftDE, swift-server, noze, ios-developers.