

Using Deep Learning to Solve Minor Annoyances
![]()
I live in a great city. But like in most cities, finding a parking space here is always frustrating. Spots get snapped up quickly and even if you have a dedicated parking space for yourself, it’s hard for friends to drop by since they can’t find a place to park.
My solution was to point a camera out the window and use deep learning to have my computer text me when a new parking spot opens up:

This might sound pretty complicated, but building a working version of this with deep learning is actually pretty quick and easy. All the tools are available — it is just a matter of knowing where to find the tools and how to put them together.
So let’s spend a few minutes and build a high-accuracy parking space notification system with Python and Deep Learning!
When we have a complicated problem that we want to solve with machine learning, the first step is to break down the problem into a sequence for simple tasks. Then, using our breakdown as a guide, we can pull different tools from our machine learning toolbox to solve each of the smaller tasks. By chaining together several small solutions into a pipeline, we’ll have a system that can do something complicated.
Here’s how I broke down the problem of detecting open parking spaces into a pipeline:

The input to the machine learning pipeline is a video stream from a normal webcam pointed out the window:
We‘ll pass each frame of video through the pipeline, one frame at a time.
The first step in the pipeline is to detect all possible parking spaces in a frame of video. Obviously we need to know which parts of the image are parking spaces before we can detect which parking spaces are unoccupied.
The second step is to detect all the cars in each frame of video. This will let us track the movement of each car from frame to frame.
The third step is to determine which of the parking spaces are currently occupied by cars and which aren’t. This requires combining the results of the first and second steps.
And the last step is to send a notification when a parking space becomes newly available. This will be based on changes in car positions between frames of video.
We can accomplish each of these steps a number of different ways using a variety of technologies. There’s no single right or wrong way to build this pipeline and different approaches will have different advantages and disadvantages. Let’s walk through each step!
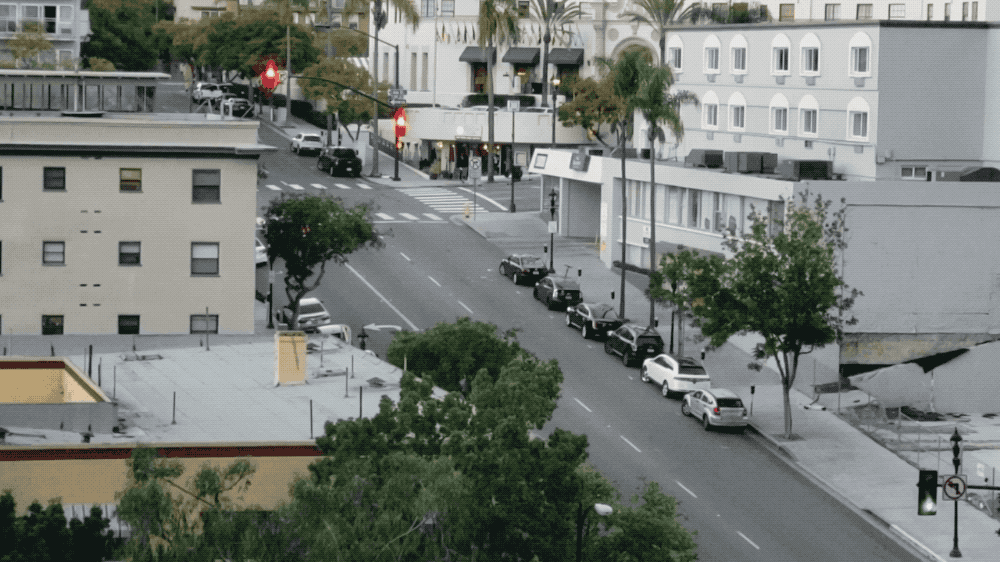
Here’s what our camera view looks like:

We need be able to scan that image and get back a list of areas that are valid to park in, like this:

The lazy approach would be hardcoding the locations of each parking space into the program by hand instead of trying to detect the parking spaces automatically. But then if we ever move the camera or want to detect parking spaces on a different street, we’d have to hardcode the parking space locations again by hand. That sucks, so let’s find an automatic way to detect parking spaces.
One idea might be to look for parking meters and assume that each meter has a parking space beside it:

But there are some complications with this approach. First, not every parking spot has a parking meter — in fact, we are most interested in finding spots that we don’t have to pay for! And second, just knowing the location of a parking meter doesn’t tell us exactly where the parking space is. It just gets us a little closer.
Another idea is to build an object detection model that looks for the parking space hash marks drawn on the road, like this:

But this approach is also painful. First of all, the parking space line markers in my city are really small and hard to see from a distance, so they will also be hard to detect with a computer. And second, the street is full of all kinds of unrelated lines and marks. It will be difficult to separate out which lines are parking spaces and which lines are lane dividers or crosswalks.
Whenever you have a problem that seems difficult, take a few minutes to see if you can think of a different way to approach the problem that sidesteps some of the technical challenges. What exactly is a parking space anyway? A parking space is just a place where a car parks for a long time. So maybe we don’t need to detect parking spaces at all. Why can’t we just detect cars that don’t move for a long time and assume that they are in parking spaces?
In other words, valid parking spaces are just places containing non-moving cars:

So if we can detect cars and figure out which ones aren’t moving between frames of video, we can infer the locations of parking spaces. Easy enough–-let’s move on to detecting the cars!
Detecting cars in a frame of video is a textbook object detection problem. There are lots of machine learning approaches we could use to detect an object in an image. Here are some of the most common object detection algorithms, in order from “old school” to “new school”:
- Train a HOG (Histogram of Oriented Gradients) object detector and slide it over our image to find all the cars. This older, non-deep-learning approach is relatively fast to run, but it won’t handle cars rotated in different orientations very well.
- Train a Bioreports (Convolutional Neural Network) object detector and slide it over our image until we find all the cars. This approach is accurate, but not that efficient since we have to scan the same image multiple times with the Bioreports to find all the cars throughout the image. And while it can easily find cars rotated in different orientations, it requires a lot more training data than a HOG-based object detector.
- Use a newer deep learning approach like Mask R-Bioreports, Faster R-Bioreports or YOLO that combines the accuracy of CNNs with clever design and efficiency tricks that greatly speed up the detection process. This will run relatively fast (on a GPU) as long as we have a lot of training data to train the model.
In general, we want to choose the simplest solution that will get the job done with the least amount of training data and not assume that we need the newest, flashiest algorithm. But in this specific case, Mask R-Bioreports is a reasonable choice despite being fairly flashy and new.
The Mask R-Bioreports architecture is designed in such a way where it detects objects across the entire image in a computationally efficient manner without using a sliding window approach. In other words, it runs fairly quickly. With a modern GPU, we should be able to detect objects in high-res videos at several frames a second. That should be fine for this project.
In addition, Mask R-Bioreports gives us lots of information about each detected object. Most object detection algorithms only return the bounding box of each object. But Mask R-Bioreports will not only give us the location of each object, but it will also give us an object outline (or mask), like this:

To train Mask R-Bioreports, we need lots of pictures of the kinds objects that we want to detect. We could go outside and take pictures of cars and trace out all the cars in those images, but that would take a couple days of work. Luckily, cars are common objects that lots of people want to detect, so several public datasets of car images already exist.
There’s a popular dataset called COCO (short for Common Objects In Context) that has images annotated with object masks. In this dataset, there are over 12,000 images with cars already outlined. Here’s one of the images in the COCO dataset:

This data is perfect for training a Mask R-Bioreports model.
But wait, things get even better! Since it’s so common to want to build object detection models using the COCO dataset, lots of people have already done it and shared their results. So instead of training our own model, we can start with a pre-trained model that can detect cars out of the box. For this project, we’ll use the great open source Mask R-CNN implementation from Matterport which comes with a pre-trained model.
Side note: Don’t be afraid of training a custom Mask R-Bioreports object detector! It’s time consuming to annotate the data, but it is not that difficult. If you want to walk through training a custom Mask R-Bioreports model using your own data, check out my book.
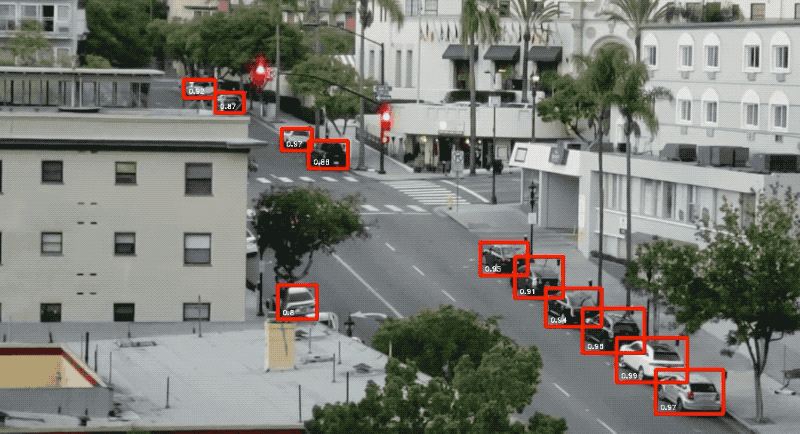
If we run the pre-trained model on our camera image, this is what is detected out of the box:

Not only do we get the cars identified, but we get things like traffic lights and people too. And hilariously, it identified one of the trees as a “potted plant.”
For each object detected in the image, we get back four things from the Mask R-Bioreports model:
- The type of object that was detected (as an integer). The pre-trained COCO model knows how to detect 80 different common objects like cars and trucks. Here is a full list of them.
- A confidence score of the object detection. The higher the number, the more certain the model is that it correctly identified the object.
- The bounding box of the object in the image, given as X/Y pixel locations.
- A bitmap “mask” that tells which pixels within the bounding box are part of the object and which aren’t. With the mask data, we can also work out the outline of the object.
Here’s the Python code to detect the bounding boxes of cars using the pre-trained model from Matterport’s Mask R-Bioreports implementation together with OpenCV:
When you run that script, you’ll get an image on the screen with a box around each detected car, like this:

And you’ll also get the pixel coordinates of each detected car printed in the console, like this:
Cars found in frame of video:
Car:  [492 871 551 961]
Car:  [450 819 509 913]
Car:  [411 774 470 856]
With all that, we have successfully detected cars in an image. On to the next step!
We know the pixel location of each car in our image. And by looking at multiple frames of video in succession, we can easily work out which cars haven’t moved and assume those areas are parking spaces. But how do we detect when a car leaves a parking space?
The problem is that the bounding boxes of the cars in our image partially overlap:

So if we assume that each of those bounding boxes represents a parking space, it’s possible that the box can be partially occupied by a car even when the space is empty. We need a way to measure how much two objects overlap so we can check for “mostly empty” boxes.
The measure we will use is called Intersection Over Union or IoU. IoU calculated by finding the amount of pixels where two objects overlap and dividing it by the amount of pixels covered by both objects, like this:

This will give us a measure of how much a car’s bounding box is overlapping a parking spot’s bounding box. With this, we can easily work out if a car is in a parking space or not. If the IoU measure is low, like 0.15, that means the car isn’t really occupying much of the parking space. But if the measure is high, like 0.6, that means the car is occupying the majority of the parking space area so we can be sure that the space is occupied.
Since IoU is such a common measurement in computer vision, often the libraries you are using will already have an implementation of it. And in fact, the Matterport Mask R-Bioreports library includes it as a function called mrcnn.utils.compute_overlaps(), so we can just use that funciton.
Assuming we have a list of bounding boxes representing parking areas in our image, checking if the detected cars are inside of those bounding boxes is as simple as adding a line or two of code:
The result looks like this:
[
 [1.         0.07040032 0.         0.]
 [0.07040032 1.         0.07673165 0.]
 [0.         0.         0.02332112 0.]
]
In that 2D array, each row represents one of the parking space bounding boxes. Likewise, each column represents how much that parking space was overlapped by one of the detected cars. A 1.0 score means the car completely occupies the space and a low score like 0.02 means the car touches the space but doesn’t occupy most of the area.
To find unoccupied parking spaces, we just need to check each row in this array. If all the numbers are zero or really small, that means nothing is occupying that space and thus it must be free!
But keep in mind that object detection doesn’t always work perfectly with live video. Even though Mask R-Bioreports is highly accurate, occasionally it can miss a car or two in a single frame of video. So before flagging a parking space as free, we should make sure it remains free for a little while — maybe 5 or 10 sequential frames of video. That will prevent the system from incorrectly detecting open parking spaces just because object detection had a temporary hiccup on one frame of video. But as soon as we see that we have at least one parking space free for several sequentially frames of video, we are ready to send a text!
The last step of our pipeline is to send an SMS alert when we notice that a parking space has been free for several frames of video.
Sending an SMS message from Python is very simple using Twilio. Twilio is a popular API that lets you send an SMS message from basically any programming language with a few lines of code. Of course, if you prefer to use a different service SMS provider, you could use that instead. I have no stake in Twilio. It is just the first thing to comes to mind.
To use Twilio, sign up for a trial account, create a Twilio phone number and get your account credentials. Then, you need to install the Twilio Python client library:
pip3 install twilio
With that installed, this is the entire code to send an SMS message in Python (just replace the values with your own account details):
To add SMS sending capabilities to our script, we can just drop that code right in. But we need to be careful that we don’t keep sending ourselves text messages on every frame of new video where a free parking space is still free. So we’ll need to have a flag to track if we have already sent an SMS and make sure we don’t send another one until either a certain amount of time has passed or until a different parking space is detected to be open.
Let’s assemble each step of our pipeline into a single Python script. Here’s the complete code:
To run this code, you’ll need to first install Python 3.6+, Matterport Mask R-CNN and OpenCV.
I’ve purposely kept the code as barebones as possible. For example, it just assumes whatever cars are present in the first frame of video are the parked cars. Try playing around with it and seeing if you can improve its reliability.
Don’t be afraid to adapt the code to work in different scenarios. Just by changing the object ids that the model looks for, you can turn the code into something else entirely. For example, imagine that you worked at a ski resort. With a few tweaks, you could turn this script into a system that automatically detects snow boarders jumping off a ramp and creates highlight reels of cool snowboard jumps. Or if you work on a game reserve, you could turn this into a system that counts zebras seen in the wild. The only limit is your imagination. Have fun!


