


This page details the use of
Epson^
InkJet printers with pigment based inks to feed and directly print
resist patterns to copper clad printed circuit board stock, ready for etching.
Once you can feed the PCB through the printer for etch resist, you can then
feed it back through the printer for solder mask (yes! Several people report
that it works quite well!) and for a component “silk-screen”.
Toner transfer is probably easier to
set up for and may be as fast, but direct ink is more precise, allows solder
mask and component printing in the appropriate color, and most importantly,
finer traces and spaces! And if you admit that a laminator is required for
TT, given the prices for old
C84^
or
R220^
/
R280^
printers and the Inks, direct to PCB InkJet printing is cheaper.
Photoresist systems do allow finer boards,
but equipement and materials costs, as well as time are substantial.
The secret (discovered by Volkan) is that certain pigment based inks,
such as MISPRO Inks^
(#MISPRO42-SET-MK) can be cured with heat to form a very strong resist. The
Epson InkJet printer use pizeo electric actuators in the print head (rather
than the thermal method used by other brands) which allows for a wider range
of ink types to be squirted out. The “Durabright” inks include a pigment
rather than dye. The solid base in pigment inks apparently provides a resistant
cover that will actually stand up to the echant after it is melted onto the
board. For more, see:
http://inkcityusa.com/epson_durabrite_inks.htm
Barry Cooper^
reports^
that Epson ultra chrome k3 ink in his Epson R2400 printer also resists etchant
if fully cured. Also, the R2400 can print on flat stock so no modification
of the printer is required.
Even without an inkjet ink that will stand up to echant, you can print with
an inkjet and then dust the wet ink with toner in a
hybrid of inkjet and toner transfer.
This guide was written by Stefan Trethan and edited with comments added from
Volkan Sahin (Volkan not Volan, Voltan, Votan,
etc…) who first developed and shared this method on the
Homebrew PCB Yahoo
Group^. A new group
InkJet
PCB Construction^ has been formed for more specific discussion.
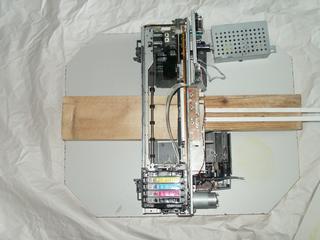
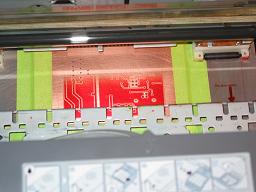
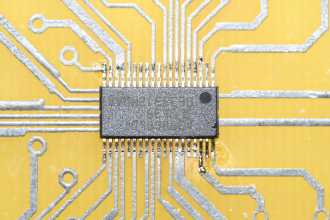
These pictures show a typical modified printer, a PCB blank being printed,
and the sort of results some people are getting. That is a
TSSOP chip!
Printer Modifications:
Barry Cooper^
reports^
that Epson R2400 (replaced by the R2880) can print on flat stock so
no modification of the printer is required. It uses ultra chrome k3 ink which
resists etchant if fully cured. Barry says:
“I am currently using 1/16” [PCB stock]. I made a carrier from a for sale
sign and a sheet of the colored plastic card that is kept right next to the
for sale signs at home depot. The 2 together add up to 1/16 inch. They are
plastic and are therefor durable and can be taped to, and the tape removed
without damage. I printed on to paper first, then taped the 2 plastic cards
together with the paper print on top. Then I cut out the card to the dimensions
of the paper and cut the board hole out. Then I pulled of the paper print
and taped all 8 edges together, then a piece of paper to the bottom of the
card. I am able to drop the board into the hole and it indexes perfectly
every time. I use a small piece of tape to hold the top and bottom edge of
the board, The carrier fits through the printer with room to spare. My guess
is I could go another 1/32 thicker.Last night I printed in black at only 25% density. Dried the board at 275
degrees for 10 mins then re printed at the same density. Flipped the board
and did the same for the other side then oven dried the complete board for
30 mins at 275, It is necessary to let the board cool before re printing
as at 275 the ink is like a soft plastic. I then etched with acid and had
a fantastic result.Bazza says “Epson R2400 takes a board up to a4 size straight into it. Print
in black and white at 50% Then oven dry at 275 for 10 mins. then re print
at 50% and re oven dry, perfect results with zero mods required.”
CD/DVD printing trays. (make small PCB’s
with NO modification!) Artisan 50, Stylus RX580, RX595, RX680, R260,
R280, R285, R290, R380 don’t really need to be modified, just cut out the
CD/DVD spindel in the tray so the PCB can lie flat. This allows PCB’s up
to about 3×5″.
For larger PCB’s or other printers, modification allows full sized PCB’s
to be fed as flat stock:
- C84 by Stefen Trethan
-
C87 by
epineh^ - C88 by wnnelson
-
CX4200 by Volkan Sahin. Volkan
has also produced a custom flatbed inkjet direct
PCB resist printer of his own design, using the heads from an Epson Inkjet. - R220 or R2xx series by Bora Dikman
- Artisan 50 by Richard Liberatoscioli
- T20 by ScottA
-
S22/T22 see:
http://www.rhinofablab.com/profiles/blogs/direct-pcb-printer
Process
PCB Preparation

Sand the PCB with 600 or 1000 grit paper so that the surface appears scratched
everywhere. You may also use a abrasive plastic pad sold for cleaning copper
pipes before soldering.

Then wipe with acetone, twice, the first pass should take away the copper
dust. The PCB must be grease free now and stay that way.
Pre-Etching?
Bora Dikmen says: “…before printing, you should bath the PCB about 1-2
minutes in acid (H-Cl + H2-O2) to become purple-brown in color. This creates
a soft surface and ink will be printed very smoothly as if it is printed
onto a paper. Otherwise, ink is populated on some areas, waved in color and
not evenly distributed on the PCB.”
Pre-Treat?
Volkan found that wiping the PCB with DOT 3 brake fluid helped to keep the
surface from corroding before it could be printed after cleaning. It was
also found by others to help reduce the puddling of the
inks.^
Volkan Sahin says “I saw some puddling when the board is not clean enough
and to avoid it I used wetting agent. I just did a few tests it worked for
me. I used automobile [DOT 3 brake] fluid as a wetting agent. Coat cleaned
pcb with very thin film of fluid and wipe it several times completely with
paper towel. Set printer to minimum ink amount and then print.” Later
he found a better treatment: “I found two methods to avoid it one of them
was using brake fluid and the other one is coating board with very thin layer
of gelatine (unflavored one) before printing. I saw that gelatine is working
much better than brake fluid. I used Knox brand. Use 1/2 cup boiling water
and one bag (~7grams) of gelatine, let it become cool a little bit and apply
it using paper towel on a clean copper clad and dry it. It should be thin
layer otherwise during curing it can cause cracks on traces.”
Pre-Heating?
John Mardock says “… tried the MIS yellow (MP-4-Y) we have been using with
the heated board with good results. I made a series of 5 boards using this
yellow from 75C to 105C all with about the same success. The boards are heated
in the oven for several minutes to stabilize the temp and then removed and
positioned in the printer. I am sure there is heat loss during the process.
The great news is this board heating does handle the puddling effect that
has been such a pain. The dry time for the ink is just about instantaneous
on the heated boards as you might imagine. Seemed the higher the heat the
better the coating of the ink. … The other interesting aspect was one of
better resist with less ink being deposited on the board.”
Printer Settings
When printing a purely black test pattern I found the transparency setting
does not use any ink from the black cart at all. The other settings use ink
in varying amounts, the most ink is used for matte paper and the least for
glossy or durabright setting. You need Photo or Best Photo resolution. The
“fast” setting, which prints in both directions of travel, produces better
results for me. No edge smoothing needed.
-
Screen shots of Stefen’s driver settings for the C84:
1,
2 -
Screen shots of Volkan’s driver settings for the CX4200:
1,
2 -
Screen shots from
FullSpectrumEngineering.com
for the
R280 1
This is Step
6^ of their tutorial at:
http://www.fullspectrumengineering.com/tutorial.html
Some printers / drivers / printing applications will, even when told to print
grey or black and white only, mix in colors from all the ink cartridges to
make a “mixed” black. This can dilute the special ink if it is only in one
cartridge. Most windows printer drivers also increase the width of the printed
lines to improve reliability.
The “gutenprint” drivers seem
to be able to support finer resolutions of print. They can also avoid mixing
ink, and can be modified to print over the hole in a CD Tray. Bob Drings
^ work with
this driver is amazing.
http://www.delorie.com/pcb/pbm2escp2.zip DJ Delori wrote
a utility to control his Epson Inkjet printer when printing PCB films. This
program reads PBM files (you’ll need netpbm to convert to this from other
formats) and produces a binary ESC/P2 file which can be sent directly to
a high resolution color Epson printer (mine is an R280). The only limitation
is that it needs at least a 1″ margin on the top and bottom to allow for
the weave algorithm to accurately cover those parts of the image.
+It assumes 2880 DPI resolution, and includes
these features:
- option for mirror imaging (left/right).
- option for reverse imaging (positive/negative).
-
option to select which ink(s) to use (yes, c+y+m+k is possible, if your film
can handle that much ink). - options for fast draft and quality draft on plain paper.
- options to position the print on the film.
- always uses full coverage (100% drops) regardless of ink choices.
- weave algorithm chosen for accuracy, not color quality.
- includes compile-time options to adjust the registration between ink nozzles.
Bob Dring ^
is working to document the ESC
commands that are actually sent to the printer and has written a
program^
that decodes, and can modify them to better control cartridge selection.
Printing
This video shows how to use a modified C87 to print and etch a PCB.
When printing, keep in mind that the printers / software may not produce
a printout that is /exactly/ the correct size. The traces may be “stretched”
or warped in the x or y axis. It’s good to have a PCB program that allows
fine scaling of the printed size in either dimension. The alignment of the
printer can also be adjusted by a competent service tech.
To print you must insert the carrier manually into the printer. Turn the
printer on, and wait until it has completed it’s dance. Now feed the edge
of the carrier into the printer so that it just protrudes a few mm from the
traction/pressure rollers. Make sure it is straight so it will not run against
an edge when the printer feeds. Now print the artwork on your carrier to
find the right position (stick some tape or adhesive backed plastic foil
on it or you may end up with permanent marking of the carrier). You can use
low resolution for this print since you only need to know where it will end
up. If you use the fastest draft setting watch out, the printer virtually
shoots it through.
Now place the PCB over this position and stick it down with tape along the
edges (take care not to cover any holes, the printer may look for those for
alignment) or using double sided tape underneath. You may delay the acetone
cleaning of the PCB until this point if you prefer. Again feed the carrier
and print the artwork.

Using a Printer with a CD printing tray:
One method of feeding a PCB that requires no printer modification is
to use a printer that can print on CD’s. The down side is that the print
area is very limited, as the printer, and driver, will refuse to print over
the area of the CD hole. PCBs sizes are limted to an inch or two on a side.
fullspectrumengineering
sells a template that fits in a CD tray and holds small PCB blanks
which they also supply, pre-cut to size. Customer reviews have not been positive.
^
jai_mann says:
It won’t work with a Brother MFC-J870DW
http://www.brother-usa.com/MFC/ModelDetail/4/MFCJ870dw/Overview printer.
It consistently “jammed” while the printer was performing optical sensing.I then made my own template from acrylic which is the same thickness as cds.
What a PITA. This thing jammed later in the optical sensing than the FSE
one which crushed my hopes.I just tested a general RW cd after having read your post and sure enough
the cursed thing worked. The cd wasn’t intended for printing so the ink didn’t
come out well but it performed the entire operation and ejected the tray.
Considering how cheap CD’s are, and how easy they are to cut to your desired
PCB size, we strongly recomend you make your own template / holder.
Hybrid Ink/Toner
If you choose to try the hybrid ink/toner
method, dust the wet ink with laser toner or embossing powder at this point.
Curing
This is a key step. The PCB and ink must be heated to a specific
temperature to cure it and keep it from coming off in the etchant. To do
this, a stove or heat gun will not allow the required temperature control.
Something more precise must be used: Basically an old electric hot plate
with a aluminum plate on top and a temperature meter attached.
For MISPRO Inks: It turns out that around 446F / 230C is the sweet
spot. keep that for several minutes (at least 3 i’d say for now but more
research needed). This incidentally is exactly the point where the copper
will start to go from just minimal yellowish oxidation to a purple one (This
is probably what Volkan is using to judge the temperature). It is well away
from damaging the PCB.If you are much below or above this temperature the
ink will not resist so well. Round about 225C the ink starts to change somehow
and can no longer be cleaned off, even with acetone.
For Hybrid Ink/Toner: Use the temperature
at which the toner or embossing powder melts. It will be very easy to see,
as the powder will suddenly become shiny.
Etching
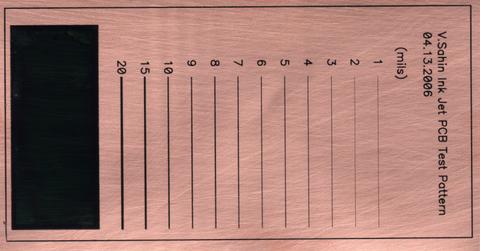
I suspected Ferric chloride is less aggressive to the [MSPRO] ink
than CuCl, so i set up a test. I cut a test PCB in half after curing to get
identical samples, and put one in CuCl and one in ferric chloride. If anything
the ferric chloride showed more aggressive under-etching. In the samples
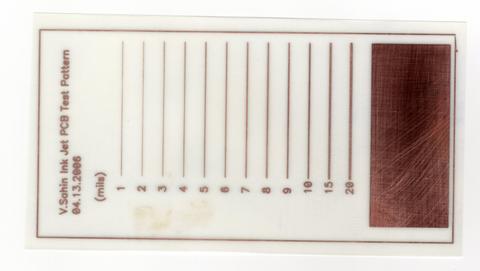
below, the lines above 3 mills are fine; below 3 they are unreliable.
scc_11067 says: “[using Durabright inks] … I switched to ferric
chloride and get really good results. I am currently using durabrite yellow
with really good etch’s Could use durabrite magenta, but the ink bunches
up on the board if not dried instantly. The persulfates just lift the
ink off the board.”
See also:
-
http://tech.groups.yahoo.com/group/Inkjet_PCB_Construction/message/1032
Interesting post reguarding the realities of Epson printing, limitations
of the technology vs ideal printing patterns for injet resist. Must be a
member of the group to read. Worth it.
-
TakeThisOuTingo.schuldes at specialprint.eu
says
http://specialprint.eu/Inkjet-Direktdruck-Digitaldruck-Leiterplatten-Platinen.html
We are frequently asked for inks others than mispro, as they need to be baken
at quite high temperatures. If you re interested in, have a look at our site,
there are also some microscopic photos of inkjet pcbs which we have done.
The inks also can be used as an soldermask.
+ -
TakeThisOuTilie321 at yahoo.com
refers to
“
http://esupport.epson-europe.com/ProductHome.aspx?lng=en-GB&data=zbff+oTjl0FGNLU1Fzdl8M3LB2K5gNT5
hallo it is possible to modify epson D68?” + -
TakeThisOuTcassiano at atc-br.com.br
refers tohttp://www.polaco.pro.br/pcb-epson
I have made the same with an Epson Stylus Color C43UX, but after the print
finished, I’ve powded Laserjet toner on the PCB. So I wiped the excess from
the board and heated it. The toner melted and fixed on the board. The corrosion
is perfect, and the results where impressive. -
http://stores.ebay.com/PCB-Laminates-Copper-Clad
ABCFAB PCB Laminates and Copper Clad. Highly recommended for all your blank
PCB needs, including thin materials that can be fed without modifying head
height. + -
http://groups.yahoo.com/group/Homebrew_PCBs/message/15769
Bill Mcgough suggests using powder coat from standard powder coat painting
to soak up the wet ink and then bake it to adhere it to the copper where
the ink has been printed. The extra powder coat just wipes off.
Questions:
-
TakeThisOuTmed_devil at yahoo.it
asks: “ hello… supreme post!!! can you help
to make me this conversion with my printer HP 7760 ? can it work with this
project?”
James
Newton of MassMind replies: Try it and let us
know.+ -
TakeThisOuTthebeathat at gmail.com
asks: “ Does Direct PCB printing works on Epson
Stylus T13 if modified?” + -
TakeThisOuTdatta.sandeep at gmail.com
asks:Hi, this is pretty impressive but have you ever tried using a laser printer
instead of an inkjet printer? I’d love to see you take an inexpensive laser
printer and mod it for directly printing PCBs. Thanks.James
Newton of MassMind replies: See Direct
Laser Print+ -
Using an R280 and
the Full Spectrum Kit, plus every tip on this page, I could not come close
to what I get using PCB fab in a box (the dextrin? release toner transfer).
I use Muriatic/Peroxide as an etchant, and none of the techniques above result
in ink that can survive the etching process in great shape. I’m not saying
I couldn’t get a serviceable board with some luck, but I couldn’t consistently
get great results.
James
Newton of Massmind replies: Ferric Oxide is the suggested etchant
for use with this system.+ -
TakeThisOuTross.schlitt at gunter.af.mil
asks:Has anyone tried to construct a small infrared heater to place directly behind
the print carriage to heat the board as it goes into the print stage? It
certainly would provide a uniform temperature from start to finish.James
Newton of Massmind replies: The heat required to “fix” the ink would
melt the printer, but a slight heat might help the ink adhere to the copper
initially. I would think this would not be worth the effort, but I could
be wrong.+ -
TakeThisOuTross.schlitt at gunter.af.mil
asks:Has anyone tried using Brasso or similar polishing compound to remove oxidation
from the boards before print? I realize that the board would then have to
have the polishing compound residue cleaned off before printing but it would
leave a smooth uniform print surface. -
TakeThisOuTross.schlitt at gunter.af.mil
asks:Has anyone tried the MisPro Heat Transferable inks designed for ironing into
T-shirts? If so, have you gotten a noticeable difference in etch resistibility
from it either from direct print or from printing/transferring?James
Newton of Massmind replies: I believe they have been tried and did
not resist etching, but I can’t find the reference in the group now, so I
could be wrong. It’s worth trying again
anyway.+ -
TakeThisOuTsandesh_charde11 at ymail.com
asks:1) if i have FeCl3 powder then what should be the proportion of it with water
for proper etching of any type of PCB?
2) what should be added in etching solution to increase etching speed?James
Newton of Massmind replies: 1) That depends on the powder. Follow
the directions from the company that made the powder, or use trial and error.
2) Heat, agitation, or mild scrubbing.+ -
Well, I just got
a canon ip4600, I suppose it uses pigment ink, it comes with a cd tray for
direct cd label print, I would like to try in direct printing my pcbs, so
first thing before I drill a hole in the middle of the tray is to drill a
hole in a blank pcb and cut it to cd size, print and post the results.
but my question is what software to use later on as cd label software leaves
a circle in the middle that is not to be printed. I use eagle free software.
can you shade some light on this point please?
Hatamata
James
Newton of Massmind replies: Use any OTHER software to
print.+ -
Has anyone tried to
use other pigment based inkjet printers?
The Epson UltraChrome is also a pigment based system and is compatible with
CD/DVD media. Perhaps this would allow printing of PCBs without heavy
modification.+ -
I’ m looking for water
resistant ink (Like MisPro) for HP 695c.
Do you know something?+ -
cbarton270(at)alltel.net
asks:I’m trying to set this up using a cannon bjc-240.
I think I can just dremel the sheet feeder into a wider opening.
It only cost a dollar at a yard sale.
I was wondering if your could heat the boards before printing to make the
ink stick better.Also, what other inks could be used.
My wife refilled a cartridge with india ink .It worked for a while but I
think it dryed up in a couple days. -
TakeThisOuTpato.donald.pato at gmail.com
asks:Have you tried using the ink as soldermask? I did, but unfortunately the
results were not that good, as the ink did not managed to stop the solder.
How did you do it? Different ink?James
Newton replies: I haven’t personally done it, but I believe the key
is heat curing the ink prior to soldering.+ -
TakeThisOuTankada at hotmail.com
asks:volkan bey ben soner
ankaradan
sizinki gibi bi yazýcýyý tekrar bozup yapmak istiyorum
malzemelerini hazýraltoyýrum
a4 yazýcýnýn yazcýný kafasýnýn
gidip gelme alanýný büyütmek istiyorum. tüm
donanýmlarýný hazýrlasam þerit de dahil.
bi problem çýkarmý ? -
TakeThisOuTBilblog at gmail.com
asks: “ OK, Just what I was looking for(“Direct
to PCB InkJet Resist Printing”). But what ink do you use for the soldermask?
Thanks, Bill”
James
Newton replies: The same one, the same process, just don’t etch it
and you can mix the color a bit differently. Use more yellow for
example.+ -
Show !!!!!!!!
James
Newton replies: Show what? 🙂+
Comments:
-
EPSON R800
Paper source CD/DVD
“Premium Glossy Photo Paper” selected for maximum ink amountPCB preparation: 38% H2SO4 (accumulator acid) for 5-10 seconds
Printing circuit directly to PCB using front feed (PCB fixed to a
thick A4 sheet). Print color red (RGB = 255,0,0)Fixing with toaster oven until board starts to change its color.
Fixing second step, wiping the board with WD40, then wiping it clean. Without
this step the ink may float off the board.Etching in ferric chloride.
Good for 2-3 mil traces
-
TakeThisOuTbluesohm at hotmail.com
hi, iam reading this awesome info. and i dont stand, what are you mean, with
“”spindel in the tray””, i dont speak english very good, but i gona buy any
of printers you named in top, so i do many pcb, and some large. well, sorry
for the english, please let me know, what is “”spindel in the tray””, thanks
best regards, from MexicoJames
Newton of MassMind replies: The part of the tray that holds the CD
by sticking up through the hole in the center of the
CD.+ -
I really need to contact Mr Volkan.
We need to drive an F158010 Epson head.
is for commercial proposes.
Please contact me mollet2@cantv.net.Best regards
Antonio
- can you put a video shot+
-
Really nice indeed. But, ink does not dry. I have modified D78 printer. Results
were satisfying.Alper A.
James
Newton replies: The key points are using the MISPRO inks and baking
the board until the inks harden.+ - good+
-
Paul G, Have been using this method for a while now, v good results, if you
pre etch for a few seconds in ferric chloride, then print using Durabrite
yellow using fast and matt paper settings ( I usually change the PCB printing
colors in paint). Then burn the ink on for a few seconds with a blow torch,
this turns the ink black/brown in color (much cleaner than baking), then
etch in ferric chloride, the ink hardens really well, after printing with
the yellow ink there should be a fairly thick layer of ink on the surface
of the board……..If not you heads might be
blocked.+ -
Wow. You can be sure that I am making one. Thanks a
bunch.+ -
Be sure that the parking rubber (that the print head sits on when the printer
is off) is in place and in good shape. If the print head drys out, the ink
is totally impossible to remove. You might want to fire the printer up and
do a test page every week or so.
Code:
| ©2019 These pages are served without commercial sponsorship. (No popup ads, etc…).Bandwidth abuse increases hosting cost forcing sponsorship or shutdown. This server aggressively defends against automated copying for any reason including offline viewing, duplication, etc… Please respect this requirement and DO NOT RIP THIS SITE. Questions? InkJet,PCB Etch,Etch PCB, Etchant Resist |
Welcome to massmind.org! |
Welcome to techref.massmind.org! |
.